函数式编程
编程范式
Programming paradigm(编程范式) 是指某种编程语言典型的编程风格或编程方式。 编程范式是编程语言的一种分类方式,它并不针对某种编程语言。就编程语言而言,一种编程语言也可以适用多种编程范式。
常见的编程范型有:函数式编程、指令式编程、过程式编程、面向对象编程等等。
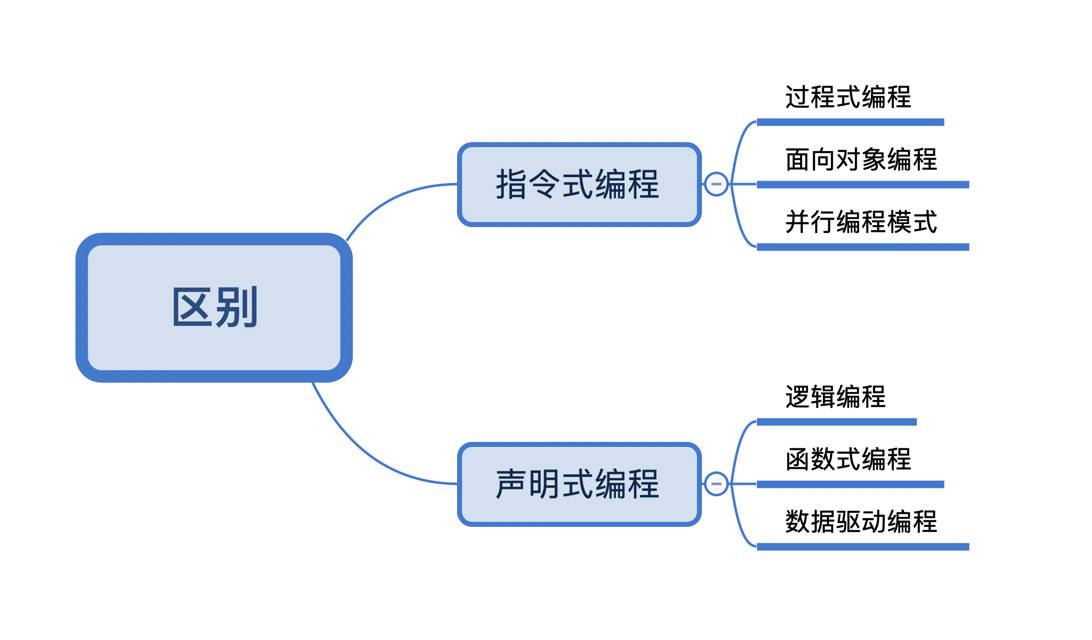
指令式编程
指令式编程、命令式编程(英语:Imperative programming);是一种描述电脑所需作出的行为的编程典范。几乎所有电脑的硬件都是指令式工作;几乎所有电脑的硬件都是能执行机器代码,而机器代码是使用指令式的风格来写的。较高端的指令式编程语言使用变量和更复杂的语句,但仍依从相同的典范。菜谱和行动清单,虽非计算机程序,但与指令式编程有相似的风格:每步都是指令。因为指令式编程的基础观念,不但概念上比较熟悉,而且较容易具体表现于硬件,所以大部分的编程语言都是指令式的。
原理和基础
很多指令式编程语言(比如Fortran、BASIC和C)是汇编语言的抽象化。
大部分的高级语言都支持四种基本的语句:
- 运算语句一般来说都表现了在存储器内的资料进行运算的行为,然后将结果存入存储器中以便日后使用。高端指令式编程语言更能处理复杂的表达式,可能会产生四则运算和函数计算的结合。
- 循环语句容许一些语句反复执行数次。循环可依据一个默认的数目来决定执行这些语句的次数;或反复执行它们,直至某些条件改变。
- 条件分支语句容许仅当某些条件成立时才执行某个区块。否则,这个区块中的语句会略去,然后按区块后的语句继续执行。
- 无条件分支语句容许执行顺序转移到程序的其他部分之中。包括跳跃(在很多语言中称为Goto)、副程序和Procedure等。
循环、条件分支和无条件分支都是控制流程。
声明式编程
声明式编程(英语:Declarative programming)或译为声明式编程,是对与命令式编程不同的编程范型的一种合称。它们建造计算机程序的结构和元素,表达计算的逻辑而不用描述它的控制流程。开发人员更关心的答案。它声明那种我们想要的结果,编程语言只关注如何产生
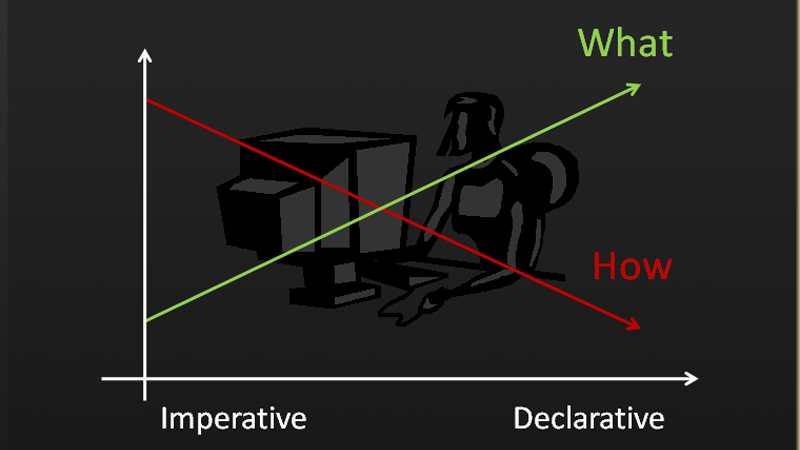
区别
- 命令式编程:命令“机器”如何去做事情(how),这样不管你想要的是什么(what),它都会按照你的命令实现。
- 声明式编程:告诉“机器”你想要的是什么(what),让机器想出如何去做(how)。
现在下面这样的表达式
1 | (1+2) * 8 / 4 |
命令式
1 | int a = 1 + 2; |
声明式
1 | divide(multiply(add(1, 2), 3), 4) |
过程式编程
过程式程序设计(英语:Procedural programming),又称过程化编程,一种编程典范,派生自指令式编程,有时会被视为是同义语。主要要采取过程调用或函数调用的方式来进行流程控制。流程则由包涵一系列运算步骤的过程(Procedures),例程(routines),子程序(subroutines), 方法(methods),或函数(functions)来控制。在程序执行的任何一个时间点,都可以调用某个特定的程序。任何一个特定的程序,也能被任意一个程序或是它自己本身调用。
过程化语言适合解决线性的算法问题,强调“自上而下”、“精益求精”的设计方式。
最初的主要过程式编程语言出现在大约1957年至1964年,包括Fortran、ALGOL、COBOL、PL/I和BASIC,后来的Pascal和C发表于大约1970年至1972年。
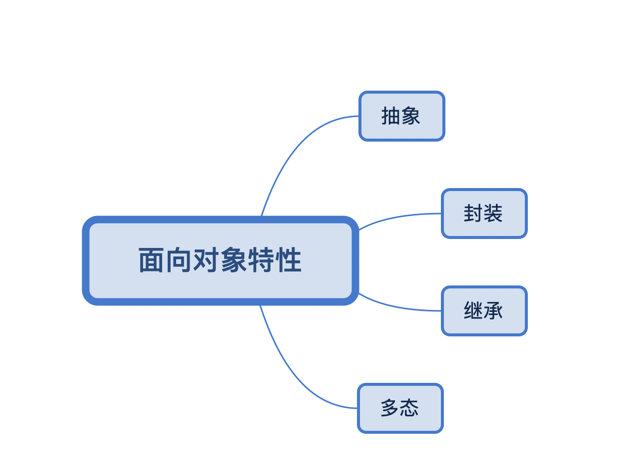
面向对象编程
面向对象程序设计(英语:Object-oriented programming,缩写:OOP)是种具有对象概念的编程典范,同时也是一种程序开发的抽象方针。它可能包含数据、特性、代码与方法。对象则指的是类(class)的实例。它将对象作为程序的基本单元,将程序和数据封装其中,以提高软件的重用性、灵活性和扩展性,对象里的程序可以访问及经常修改对象相关连的数据。在面向对象程序编程里,计算机程序会被设计成彼此相关的对象。
重要的面向对象编程语言包含Common Lisp、Python、C++、Objective-C、Smalltalk、Delphi、Java、Swift、C#、Perl、Ruby、JavaScript 与 PHP等。
并行编程模式
在计算机科学中,并行编程模型(Parallel programming model)是并行计算机架构的抽象化,通过它可方便的表达算法和它们在程序中的合成。判别编程模型的价值可以通过它的通用性:在各种不同架构上能表达多大范围的不同问题,和它的性能:编译的程序在执行时有多高的效率[1]。并行编程模型的实现形式可以是从“顺序编程”语言中调用的函数库,作为现存语言的扩展,或作为全新的语言。
围绕特定编程模型的共识是很重要的,这可导致建造不同的并行计算机来支持这个模型,从而促进软件的可移植性。在这个意义上,编程模型被称为在硬件和软件之间的桥接[2]。
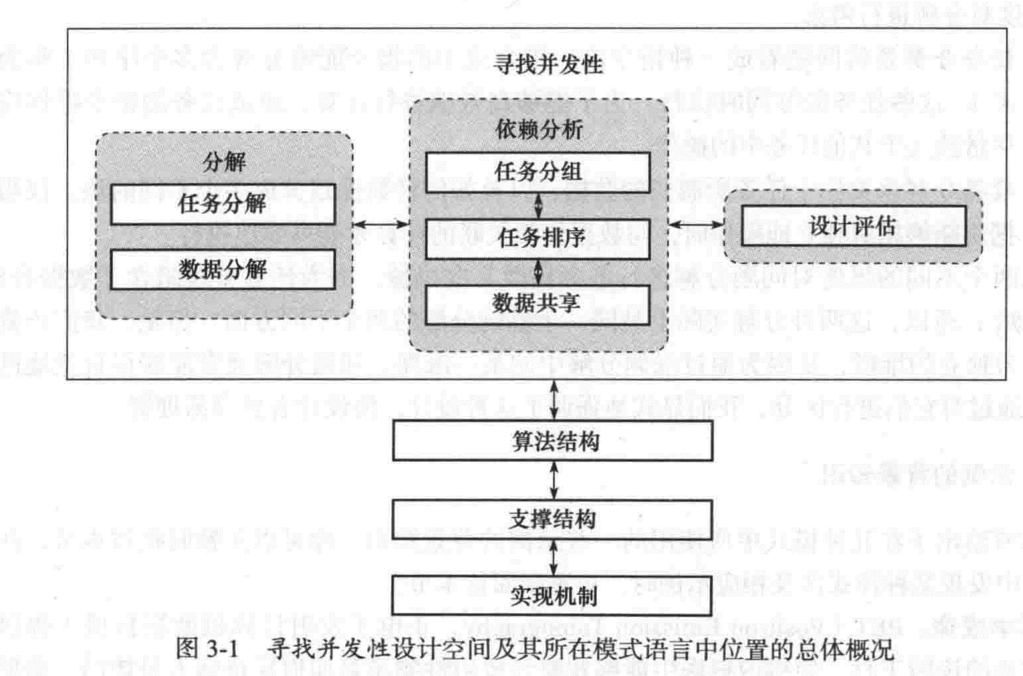
关键:
- 任务分解,识别出多个能够并发执行的任务
- 数据分解,识别出从属于每个任务的局部数据
- 分组任务和排序分组的方式满足时间约束
- 任务之间的依赖分析
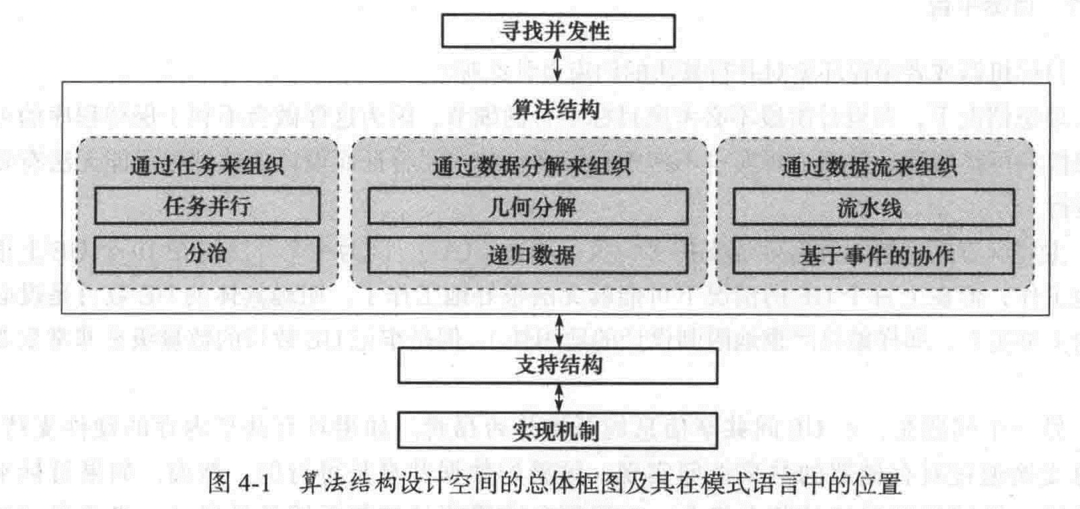
关键:
- 任务并行,重点要解决任务之间的依赖性,解决顺序依赖约束和共享数据依赖约束,可以通过消除依赖、分离依赖等方式解决;通过轮询、工作窃取法等方式来实现调度
关键:
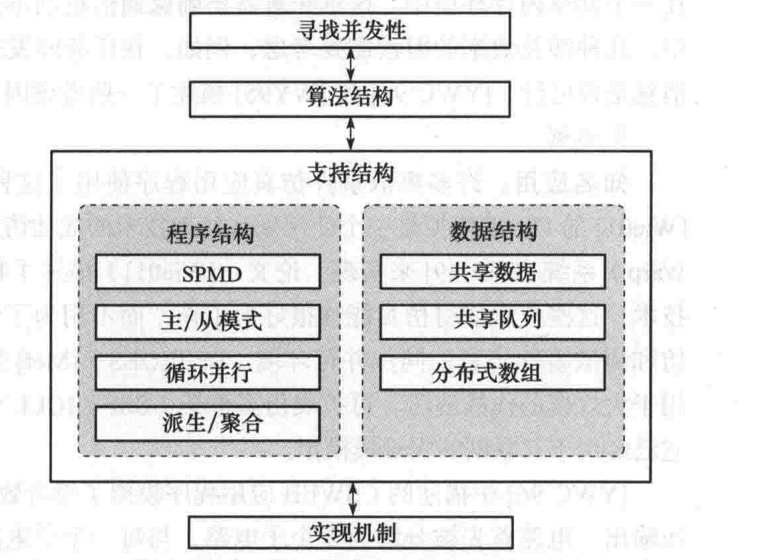
- SPMD(单程序多数据)。在SPMD程序中,所有UE(执行单元)并行执行同一个程序(单程序),但每个UE都拥有自己的私有数据集(多数据)
- 主从模式。主进程为从进程建立一个工作池和一个任务包。所有从进程并发执行,每个从进程迭代的从任务包中移除一个任务并处理它,指导所有任务都处理完毕或到达某些终止条件为止
- 循环并行。该模式解决计算密集型循环为主导串行程序转成并行程序时出现的问题
- 派生聚合模式Fork/Join 模式。一个主UE里面Fork出多个子的UE,这些子UE并行完成任务的一部分,等待这一步的全部子UE完成了这些任务之后,进行聚合操作。
- 共享数据。解决多个UE共享数据时常见问题,并讨论正确性和性能。共享内存是在进程间传递数据的高效方式。在共享内存模型中,并行进程共享它们可以异步读与写的全局地址空间。异步并发访问可能导致竞争条件,和用来避免它们的机制如:锁、信号量和监视器。常规的多核处理器直接支持共享内存
- 分布式数组模式。一维或多维数组,被划分为多个子数组,并在进程或线程间进行分配
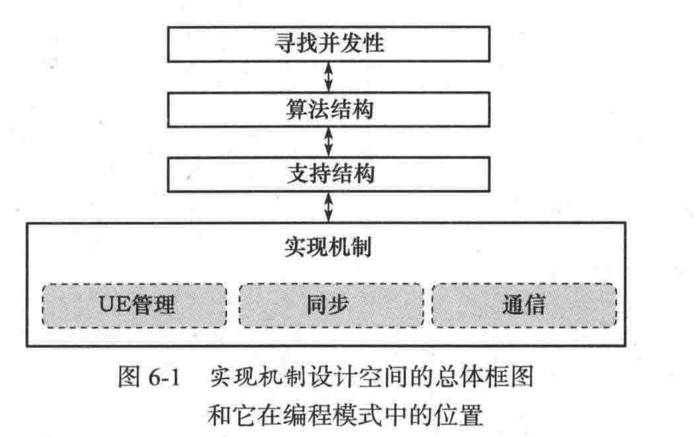
关键:
- UE管理。线程/进程的创建和销毁
- 同步。内存同步和围栅、栏栅、互斥
- 通信。消息传递、集合通信
逻辑编程
逻辑编程是种编程典范,它设定答案须符合的规则来解决问题,而非设定步骤来解决问题,过程是事实+规则=结果。
事实
实际上,每个逻辑程序都需要使用事实才能实现给定的目标。事实基本上是关于程序和数据的真实陈述。例如,新德里是印度的首都。
规则
实际上,规则是允许我们对问题域做出结论的约束。规则基本上写成逻辑条款来表达各种事实。例如,如果我们正在构建任何游戏,那么必须定义所有规则。
规则对于解决逻辑编程中的任何问题非常重要。规则基本上是逻辑结论,可以表达事实。以下是规则的语法
1 | A∶− B1,B2,...,Bn. |
这里,A是头部,B1,B2,… Bn是身体。
例如 − ancestor(X,Y) :- father(X,Y).
ancestor(X,Z) :- father(X,Y), ancestor(Y,Z).
这可以理解为,对于每个X和Y,如果X是Y的父亲而Y是Z的祖先,则X是Z的祖先。对于每个X和Y,X是Z的祖先,如果X是Y和Y的父亲是Z的祖先。
python-kanren
数据驱动编程
在计算机编程中,数据驱动编程,是一种编程范式,在其中程序语句描述要匹配的数据,和对它需要做的处理,程序本身不定义选取数据的一序列文件操作步骤[1]。数据驱动语言的标准例子是文本处理语言sed和AWK[1],在其中数据是输入流中的一序列的行,因而它们也叫面向行的语言,而模式匹配主要通过正则表达式或行号来完成。
在数据驱动的编程中,由数据本身驱动程序的逻辑。在游戏编程中,通常是数据驱动的编程方式使用某种形式的脚本语言。游戏的行为由变化的数据文件决定,而不做任何重新编译。
无数据驱动的时候
1 | data_lloyd = {'name': 'Lloyd', 'lives': 'Alcoy } |
数据驱动
1 | data_lloyd = {'name': 'Lloyd', 'lives': function(){ print("Alcoy, Spain") } |
demo:
我们将使用一个简单的门。当玩家进入一个触发器区域,门打开时,当玩家离开引发地区,门关闭:

如果我们让触发器区域覆盖整个门,然后门更多的是一种视觉细节,像一个星际旅行输送机的门:

我们可以创建一个触发门对象有两个部分:一个触发器区域(即不是画在屏幕上),和一个物理的门,这是绘制在屏幕上,和通过阻止玩家/怪物。我们的门可以有两种状态,打开和关闭。关闭时,碰撞区域的门充满整个部分的走廊,当打开碰撞区域移动(或门对象标记为一个对象,不会撞上东西。)
1 | class WorldObject |
1 | class TriggeredDoor : WorldObject |
1 | <TriggeredDoor> |
当你输入一个特定的体积。如果有一个全局函数,关掉灯,我们可以在我们的世界文件中创建一个条目,看起来像下面的:
1 | <TriggeringArea> |
脚本执行器
1 | Object obj = Scripting.GetInstance(); // Get a pointer ot the object |
在其之下隐藏的设计思想
1、控制复杂度。通过把程序逻辑的复杂度转移到人类更容易处理的数据中来,从而达到控制复杂度的目标。代码流程从命令式变成了 声明式
2、隔离变化。像上面的例子,每个消息处理的逻辑是不变的,但是消息可能是变化的,那就把容易变化的消息和不容易变化的逻辑分离。
3、机制和策略的分离。机制就是消息的处理逻辑,策略就是不同的消息处理。
函数式编程
函数式编程,或称函数程序设计、泛函编程(英語:Functional programming),是一种编程范式,它将电脑运算视为函数运算,并且避免使用程式状态(英语:State (computer science))以及易变物件。其中,λ演算为该语言最重要的基础。而且,λ演算的函数可以接受函数作为输入參數和输出返回值。
比起指令式編程,函数式编程更加强调程序执行的结果而非执行的过程,倡导利用若干简单的执行单元让计算结果不断渐进,逐层推导复杂的运算,而不是设计一个复杂的执行过程。
在函数式编程中,函数是头等对象,意思是说一个函数,既可以作为其它函数的输入参数值,也可以从函数中返回值,被修改或者被分配给一个变量。
早在50年代函数式编程开始之前,Lisp 语言就已经在 IBM 700/7000 系列的科学计算机上运行了。Lisp 引入了很多与我们现在的函数式编程有关的示例与功能,我们甚至可以称 Lisp 是所有函数式编程语言的鼻祖。
这也是函数式编程中最有趣的方面,所有函数式编程语言都是基于相同的 λ演算,这种简单数学基础。
λ演算是图灵完备的,它是一种通用的计算模型,可用于模拟任何一台单带图灵机。它名字中的希腊字母 lambda(λ),被使用在了 lambda 表达式和 lambda 项绑定函数中的变量中。
λ演算是一个极其简单但又十分强大的概念。它的核心主要有两个概念:
- 函数的抽象,通过引入变量来归纳得出表达式;
- 函数的应用,通过给变量赋值来对已得出的表达式进行计算;
让我们来看个小例子,单参数函数 f,将参数递增1。
1 | f = λ x. x+1 |
假设我们应用函数在数字5上,那么函数读取如下:
1 | f(5) => 5 + 1 |
函数式编程的基本原理
现在,数学知识已经够了。让我们看一下使函数式编程变得强大的特性有哪些?
头等函数(first-class function)
在函数式编程中,函数是一等公民,意思是说函数可以赋值给变量,例如在 elixir 中,
1 | double = fn(x) -> x * 2 |
然后我们可以如下来调用函数:
1 | double.(2) |
scala
1 | def m(x: Int):Int = x * 2 |
scala匿名函数/闭包
1 | val m = (x: Int) => x * 2 |
java中的运用
1 | @FunctionalInterface |
一个最常用的Function

1 | Function<Integer,Integer> function = x -> x * 2; |
高阶函数(higher-order function)
高阶函数的定义是,接收一个或多个函数变量作为参数,然后生成的新函数,即为高阶函数。具体有两种情况:
- 函数可以作为参数被传递
- 函数可以作为返回值输出
让我们再次使用函数 double 来说明这个概念:
1 | double = fn(x) -> x * 2 |
这例子中,Enum.map 将一个枚举列表作为第一参数,之前定义的函数作为第二参数;然后将这个函数应用到枚举中的每一个元素,结果为:
1 | [2,4,6,8,10,12,14,16,18,20] |
scala中的高阶函数
1 | def test(f:Int => String , num : Int) = f(num) |
java中的例子
1 | Integer[] arr = new Integer[]{2,4,6,8,10,12,14,16,18,20}; |
java非常常见的写法
1 | Arrays.sort(arr, (s1, s2)->s1.compareToIgnoreCase(s2)); |
不可变状态(Immutable State)
在函数式编程语言中,状态是不可变的。这意味着一旦一个变量被绑定了一个值,它将不能再被重新定义。这在防止副作用与条件竞争上有明显的优势,使并发编程更简单。
另外,函数式编程中的“值不可变性”避免了对公共的可变状态进行同步访问控制的复杂问题,能够较好满足分布式并行编程的需求,适应大数据时代的到来。
和上面一样,让我们使用 Elixir 来说明一下这概念:
1 | iex> tuple = {:ok, "hello"} |
这个例子中,tuple 的值从来没有改变过,第三行 put_elem 是返回了一个完全新的 tuple, 而没有去修改原有的值。
Scala 中定义变量分为 var(可变变量)和 val(不可变变量)
Scala 中集合框架也分为可变集合和不可变集合。比如 List(列表) 和 Tuple(元组)本身就是不可变的,set 和 map 分为可变和不可变的,默认为不可变。
1 | //创建List |
函数组合子(Functional Combinators)
组合子逻辑意图作为简单的元逻辑,它能澄清在逻辑符号中的量化变量的意义,并真正的消除对它们的需要。消除量化变量的另一种方式是蒯因的谓词函子。尽管多数组合子逻辑系统超出了一阶逻辑的表达能力,蒯因的谓词函子的表达能力等价于一阶逻辑
- map对列表中的每个元素应用一个函数,返回应用后的元素所组成的列表。
- filter移除任何对传入函数计算结果为false的元素。返回一个布尔值的函数通常被称为谓词函数[或判定函数]。
- zip将两个列表的内容聚合到一个对偶列表中。
- partition将使用给定的谓词函数分割列表。
- find返回集合中第一个匹配谓词函数的元素。
- foldLeft,0为初始值(记住numbers是List[Int]类型),m作为一个累加器。
- flatten将嵌套结构扁平化为一个层次的集合。
- flatMap是一种常用的组合子,结合映射[mapping]和扁平化[flattening]。 flatMap需要一个处理嵌套列表的函数,然后将结果串连起来。
scala
1 | scala> numbers.map((i: Int) => i * 2) |
1 | Integer[] arr = new Integer[]{2,4,6,8,10,12,14,16,18,20}; |
柯里化函数(Currying)
在计算机科学中,柯里化(Currying)是把接受多个参数的函数变换成接受一个单一参数(最初函数的第一个参数)的函数,并且返回接受余下的参数且返回结果的新函数的技术。
1 | scala> def mul(x:Int,y:Int):Int = x *y |
运用
1 | def getLines(filename: String)(isFileReadable: (File) => Boolean)(closableStream: (Closeable) => Unit):List[String] = { |
spark源码
1 | def sql(sqlText: String): DataFrame = { |
java中的柯里化
1 | Function<String, |
函数式编程下的并发编程
一般来说有两种策略用来在并发线程中进行通信:共享数据和消息传递。使用共享数据方式的并发编程面临的最大的一个问题就是数据条件竞争。处理各种锁的问题是让人十分头痛的一件事。
传统多数流行的语言并发是基于多线程之间的共享内存,使用同步方法防止写争夺,Actors使用消息模型,每个Actor在同一时间处理最多一个消息,可以发送消息给其他Actor,保证了单独写原则。从而巧妙避免了多线程写争夺。和共享数据方式相比,消息传递机制最大的优点就是不会产生数据竞争状态。实现消息传递有两种常见的类型:基于channel(golang为典型代表)的消息传递和基于Actor(erlang为代表)的消息传递。
Actor简介
Actor模型(Actor model)首先是由Carl Hewitt在1973定义, 由Erlang OTP 推广,其 消息传递更加符合面向对象的原始意图。Actor属于并发组件模型,通过组件方式定义并发编程范式的高级阶段,避免使用者直接接触多线程并发或线程池等基础概念。
Actor模型=数据+行为+消息。
erlang,在语言层面就提供了Actor模型的支持,RabbitMQ 就是基于erlang开发的。
无锁
JAVA并发编程时需要特别的关注锁和内存原子性等一系列线程问题,而Actor模型内部的状态由它自己维护即它内部数据只能由它自己修改(通过消息传递来进行状态修改),所以使用Actors模型进行并发编程可以很好地避免这些问题。Actor内部是以单线程的模式来执行的,类似于redis,所以Actor完全可以实现分布式锁类似的应用。
异步
每个Actor都有一个专用的MailBox来接收消息,这也是Actor实现异步的基础。当一个Actor实例向另外一个Actor发消息的时候,并非直接调用Actor的方法,而是把消息传递到对应的MailBox里,就好像邮递员,并不是把邮件直接送到收信人手里,而是放进每家的邮箱,这样邮递员就可以快速的进行下一项工作。所以在Actor系统里,Actor发送一条消息是非常快的。
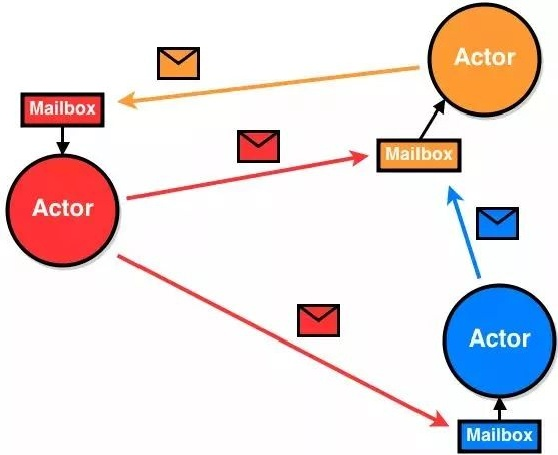
这样的设计主要优势就是解耦了Actor,数万个Actor并发的运行,每个actor都以自己的步调运行,且发送消息,接收消息都不会被阻塞。
隔离
每个Actor的实例都维护这自己的状态,与其他Actor实例处于物理隔离状态,并非像 多线程+锁 模式那样基于共享数据。Actor通过消息的模式与其他Actor进行通信,与OO式的消息传递方式不同,Actor之间消息的传递是真正物理上的消息传递。
天生分布式
每个Actor实例的位置透明,无论Actor地址是在本地还是在远程机器上对于代码来说都是一样的。每个Actor的实例非常小,最多几百字节,所以单机几十万的Actor的实例很轻松。如果你写过golang代码,就会发现其实Actor在重量级上很像Goroutine。由于位置透明性,所以Actor系统可以随意的横向扩展来应对并发,对于调用者来说,调用的Actor的位置就在本地,当然这也得益于Actor系统强大的路由系统。
1 | case class SetRequest(key: String, value: String) |
思维的转变
总结下函数式常用思维方式:
- 表达式化
就是去掉变量,去掉循环,通过表达式处理逻辑。 - 数据与行为分离,无副作用
由于严格作用域,必须没有副作用。 - 高阶思维
能用 map 解决的,就不要 for 循环 - 组合思维
函数式和面向对象是相反的,面向对象是自顶向下的设计,函数式是自底向上的设计,也就是先定义基本操作,然后不断组合。比如 sql 定义了 select, from, where … 这些组合子来满足查询需求。


 如图所示,InnoDB使用的是聚集索引,teacher_id身为二级索引,就要维护一个索引字段和主键id的树状结构(这里用链表形式表现),并保持顺序排列。
